Put your back into it (me that is)
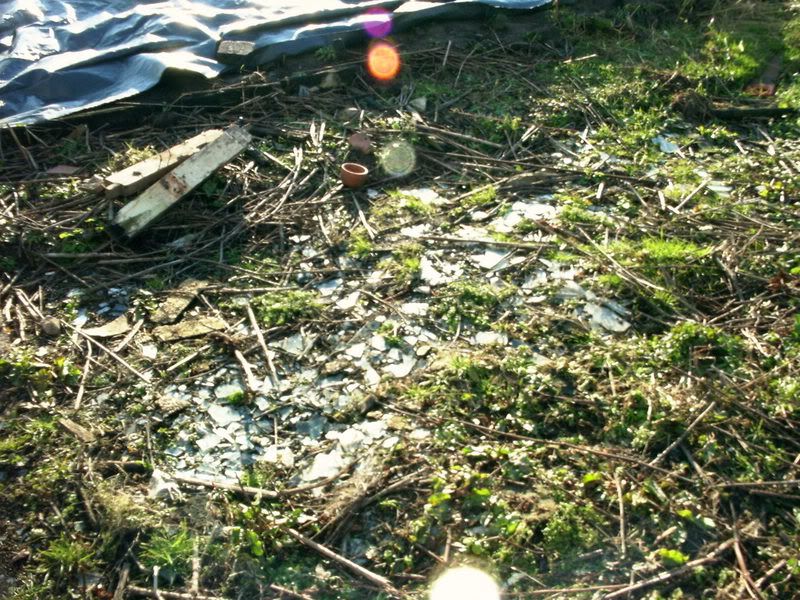
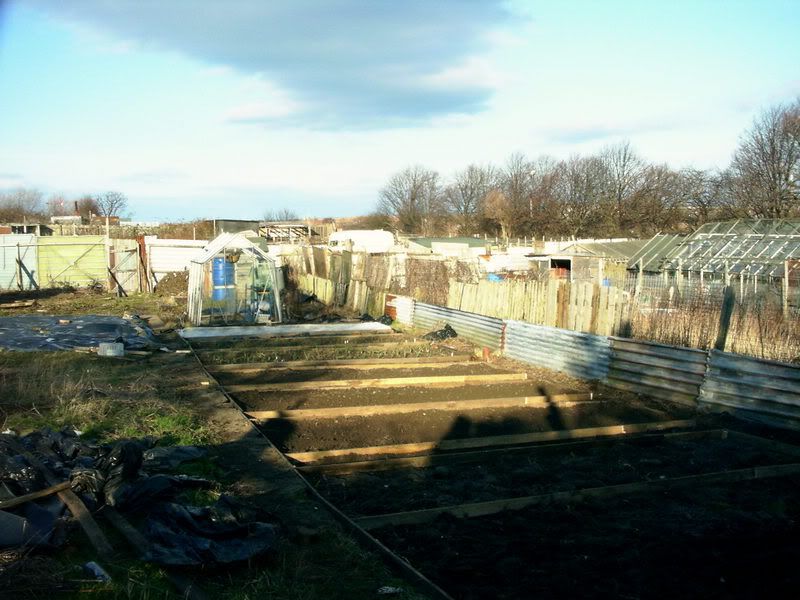
Hey guys, hope everyone is well. Decided it was about time I got my finger out and started getting the plot into shape proper for this season, so took a couple of days off work this week. Monday and Tuesdays forecast looked good, and for once the forecast was right. This allowed me to get pretty much everything I had planned to do out of the way. Now, I have had this plot for a year now, which realistically means that it should be all ship shape, but there has been one major problem. The state of the ground. As you can see from this picture, it's not that good. 99.9% of the ground on my plot was like this, glass, rubble, rubbish etc all over the place. So it has not just been a case of turning the ground over, as this has been in a layer of up to a couple of inches in some places, hence it has been a long drawn out process. It is a case of raking the ground over, digging into it with a fork, raking it again to get rid of the next layer of detritus, digging it again etc. So I suppose you can forgive me for not having a completely clear plot by now. However, I had a clear goal set out for these two days, and that was to have the left hand side beds finished. This basically involved a lot of digging, raking, digging and cultivating, then creating the framework for the beds. Back breaking work, but worthwhile and very rewarding at the end of the two days. The remaining ground was cleared of glass etc, then raked over and dug. This was a patch of about 10ft by 15ft, and was dug to a spades depth. The framework for each bed was then built and fastened into the ground (barring the last two beds, as I ran out of wood), before the clods were broken up with a three pronged cultivator ( I think they are called an ibis, NFG will probably put me right on this later). Once the ground was broken up, the soil rake came out to level and reduce the size of the clumps. After the beds were level, my other rake was used, to create a fine crumb. I have to admit that this rake is one of my favourite bits of kit, purely for the fact that it used to belong to my nanna, and must be at least 30 years old
 . It produces fantastic results, that you can probably see from the picture. What you can also see is that the last two beds need to have the frames built, as I said earlier, and one bed is framed but needs breaking up and raking. This should be done on Sunday weather permitting. The first two beds here have had lime added to them, preparing them for the carrots and parsnips that will go in there. Once the rain has taken the lime into the soil, a top dressing of Fish blood and bone will be added. The carrots and parsnips will then be planted probably the second week in February, the carrots being companion planted with onions as a deterrent (hopefully) to carrot root fly. The next three beds are for the potatoes. The charlotte and harlequin will occupy the first bed, with the next two beds housing the king edwards, maris piper and desiree main crops. These will be interspersed with shallots between the rows. The potatoes and shallots will go into the ground mid march for the salad and earlies, and beginning of April for the main crops. The last bed on this side will take brassicas, which will consist of the all year round caulis that are currently in the greenhouse, along with cabbage and calabrese / broccoli (I think I have some of these to start off early March time). So, I think you will agree that the two days were well spent getting this patch of ground ready. Sunday will also be spent preparing the ground to the right of the picture, currently covered in plastic. The first patch, up to the level of the greenhouse will be the fruit cage. The ground will be framed off into one big 'C' shaped bed at the weekend ready for the frame to be built around it. This means that I will be able to get raspberry canes into the ground on time in March (both summer and autumn fruiting varieties), as well as strawberries which will be started from seed in the greenhouse. As there will be no fruit on them straight away, it gives me a little time to get the cage built. I also used the time over the last couple of days to organise my seeds. This basically meant labeling twelve envelopes up with the months, and then putting the seeds packets into the appropriate envelope, depending on sowing date. Oh, and I also built a new gate, which I will show on the next update. Right, that's it for now, will post the next update after Sunday.
Cheers. P
 As you can see from this picture, it's not that good. 99.9% of the ground on my plot was like this, glass, rubble, rubbish etc all over the place. So it has not just been a case of turning the ground over, as this has been in a layer of up to a couple of inches in some places, hence it has been a long drawn out process. It is a case of raking the ground over, digging into it with a fork, raking it again to get rid of the next layer of detritus, digging it again etc. So I suppose you can forgive me for not having a completely clear plot by now. However, I had a clear goal set out for these two days, and that was to have the left hand side beds finished. This basically involved a lot of digging, raking, digging and cultivating, then creating the framework for the beds. Back breaking work, but worthwhile and very rewarding at the end of the two days. The remaining ground was cleared of glass etc, then raked over and dug. This was a patch of about 10ft by 15ft, and was dug to a spades depth. The framework for each bed was then built and fastened into the ground (barring the last two beds, as I ran out of wood), before the clods were broken up with a three pronged cultivator ( I think they are called an ibis, NFG will probably put me right on this later). Once the ground was broken up, the soil rake came out to level and reduce the size of the clumps. After the beds were level, my other rake was used, to create a fine crumb. I have to admit that this rake is one of my favourite bits of kit, purely for the fact that it used to belong to my nanna, and must be at least 30 years old
 . It produces fantastic results, that you can probably see from the picture. What you can also see is that the last two beds need to have the frames built, as I said earlier, and one bed is framed but needs breaking up and raking. This should be done on Sunday weather permitting. The first two beds here have had lime added to them, preparing them for the carrots and parsnips that will go in there. Once the rain has taken the lime into the soil, a top dressing of Fish blood and bone will be added. The carrots and parsnips will then be planted probably the second week in February, the carrots being companion planted with onions as a deterrent (hopefully) to carrot root fly. The next three beds are for the potatoes. The charlotte and harlequin will occupy the first bed, with the next two beds housing the king edwards, maris piper and desiree main crops. These will be interspersed with shallots between the rows. The potatoes and shallots will go into the ground mid march for the salad and earlies, and beginning of April for the main crops. The last bed on this side will take brassicas, which will consist of the all year round caulis that are currently in the greenhouse, along with cabbage and calabrese / broccoli (I think I have some of these to start off early March time). So, I think you will agree that the two days were well spent getting this patch of ground ready. Sunday will also be spent preparing the ground to the right of the picture, currently covered in plastic. The first patch, up to the level of the greenhouse will be the fruit cage. The ground will be framed off into one big 'C' shaped bed at the weekend ready for the frame to be built around it. This means that I will be able to get raspberry canes into the ground on time in March (both summer and autumn fruiting varieties), as well as strawberries which will be started from seed in the greenhouse. As there will be no fruit on them straight away, it gives me a little time to get the cage built. I also used the time over the last couple of days to organise my seeds. This basically meant labeling twelve envelopes up with the months, and then putting the seeds packets into the appropriate envelope, depending on sowing date. Oh, and I also built a new gate, which I will show on the next update. Right, that's it for now, will post the next update after Sunday.
Cheers. P


